Tutorial: How to create a 'Matterport style' virtual tour with Kuula

Kuula offers all the tools necessary to create great looking interactive tours of residential and commercial properties. This article will show you how to create a virtual walk-through using the Kuula virtual tour editor for a fraction of the price of Matterport!
Complete creating your tour in less than 3 hours
Before we start, take a moment to look at the tour below, as it perfectly illustrates what we're going to create:
This is a tour of a 2800 square feet apartment (260 m2) located in Pacific Palisades, Los Angeles. Using the Pilot Era panoramic camera, we took 40 photos in about one and a half hours. Uploading the pictures to Kuula and creating the tour took another hour. So, we went from photo shoot to a ready product in less than half a day! Here's how we did it.
Plan the photo shoot
Kuula supports a large majority of panoramic and 360 cameras on the market as well as panoramas made with DSLR photographic cameras and even images rendered in 3d software! Therefore, you can build a virtual tour with Kuula using any set of photos.
A little bit of planning will allow you to build the tour much faster. Planning also helps to avoid users getting disoriented when they navigate the property.
If you shoot too many photos, you will have more work when editing the virtual tour. Your users, in turn, will need to click more times to get from one area to the next.
If you take too few photos, the jumps from one place to the other will be to too drastic and this can make users disoriented and lost in space.
In our experience, it's best to shoot photos at intervals of about 10-15 feet (3-4 meters) unless you are close to a door or a corridor corner. In this case, you need to make sure there is a visual continuity between photos. This may require that you shoot more pictures in certain areas. The rule of thumb is, in each panorama, you should be able to see the points where both the previous and the next photo will get you to.
Height wise, it's best to set the camera lens around 5 feet above the ground level (150cm). Slightly below average eye level. If the camera too high up, when looking at the floor there will be too much perspective distortion.
Enable "Walk-through Mode" Walk-through Mode
After you shoot all the panoramas, upload them to Kuula using the Create Tour function and remember to enable walk-through mode. This will ensure that the direction of the panoramas will be dynamically caculated based on the hotspot positions, giving the user a feeling that they are moving through the space.
It's easier to understand, if you experience it for yourself. You can see this feature in action in the virtual tour embedded above.

Enabling walk-through mode is simple. On the Create Tour screen, select the checkbox as shown above. Here's a help article that discusses this feature in detail.
Position hotspots on the floor
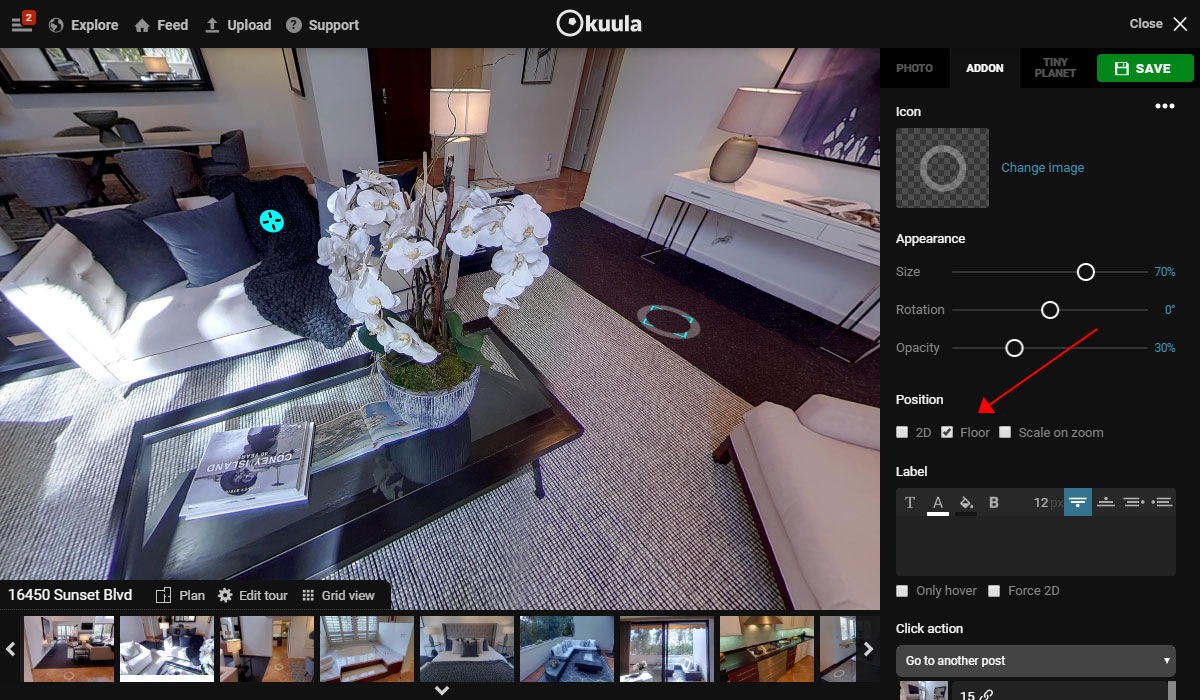
In the Kuula editor, you can choose to position a hotspot (called Hotspot) in the panorama in a way, so that it's rendered on the floor.

The position on the floor gives a more intuitive way to show the users in which direction they can move. It also blends more naturally with the panoramic photo in the background.
The setup of a hotspot on the floor is easy. Simply check the Floor box as shown on the screenshot above. After that, you can move it around using drag & drop like, in the same way as other elements in the editor.
Use automatic back-links
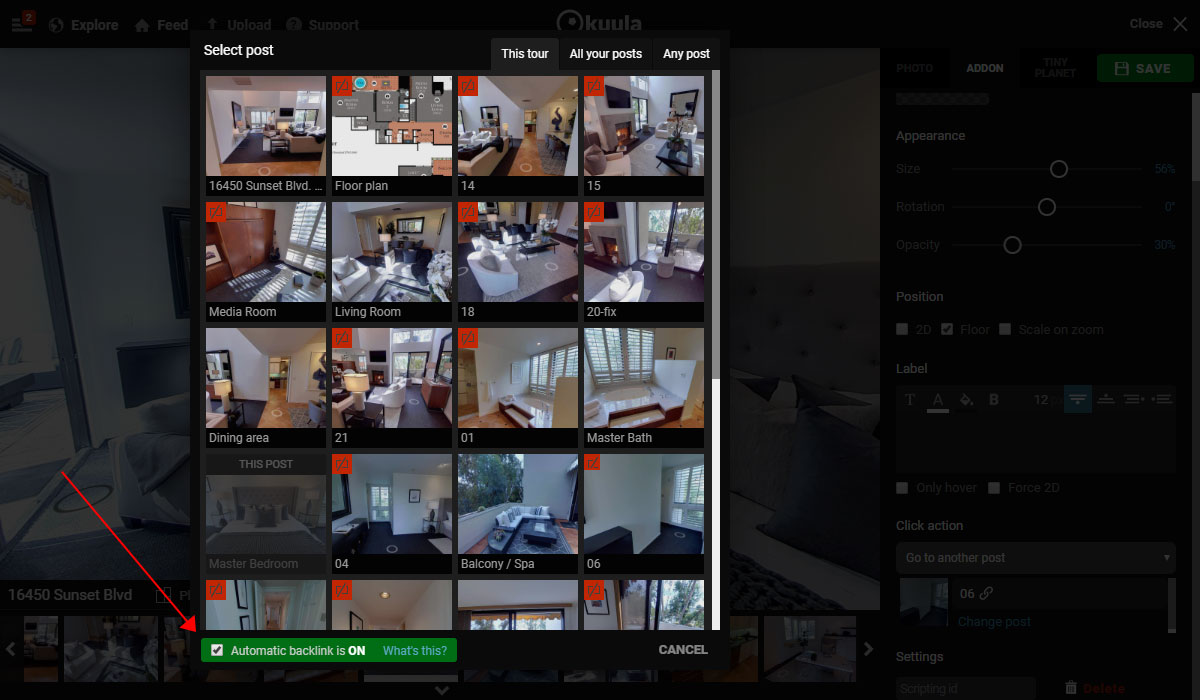
Finally, to speed up the process of creating a tour, make sure to enable automatic back-links Backlinks when linking photos. When you add a hotspot, in the Click action section, select Go to another post from the dropdown. This will open a window as show on the screenshot below. To enable back-links, just make sure the checkbox at the bottom is checked.

With automatic back-links, you can cut the time needed to build the tour by 50%! Here's a help article in which we show you how to use this feature with details.
Advanced functions
As you create more tours, you will have more experience with the functions described above. With more experience, you will be more productive and deliver links to finished tours faster to your clients. This means you can do more tours in shorter period of time!
You'll be happy to know that there are even more features in the editor, which can streamline the process of building tours. You can use editing functions such as cut, copy and paste on all hotspots and other elements in the photo. You also have numerous keyboard shortcuts at your disposal.
We hope that this article you will help you discover how easy it is to build advanced interactive tours with Kuula!
