How to shoot Panoramas with DSLR camera and a fisheye lens

In professional 360 photography, high-resolution DLSR (full-frame) cameras equipped with fisheye lenses allow to produce highest quality, large panoramas with just a few snaps. Regardless of the brand or model, the best cameras for this purpose should be lightweight, high-performing and equipped with a fisheye lens.
This article covers all the necessary topics to get started shooting high quality 360 panoramas using a DLSR camera. Here's a sample photo shot using the technique described below:
Setup

Fisheye Lens
Lenses used in 360 photography with full-frame cameras are often referred to as "cropped Fisheye". This is due to the circular cropped out image they produce. To achieve this effect, a full-frame fisheye lens designed for APS-C sensors is used on a full-frame sensor and the lens hood needs to be removed to avoid it being visible in the frame.
Some models allow the lens hood to be removed manually, while others need to be trimmed using a cutting disc, a knife or similar tool. Here are a couple of videos showing how to do it: "Shaving Samyang 8 mm fisheye", "Shaving fisheye lenses".
Popular fisheye lenses include the Samyang 8 mm, Nikkor 10.5 mm, Sigma 10 mm, Tokina SZ 8 mm, and TTArtisan 7.5 mm. The market for fisheye lenses is constantly expanding, with new models being introduced regularly, providing photographers with a wide range of options. These lenses come with different focal lengths but all will produce a circular crop in the 24x36 frame. There are also fisheye zoom lenses available on the market, such as the Canon 8-15 and the Nikon 8-15, and the Tokina 10-17.
One of my personal favorites is the Samyang 8 mm f/2.8 UMC II. Although the Canon and Nikon 8-15 zooms offer better performance, they are also larger and heavier.
When taking a 360 photo, you will shoot in a portrait position. With this the aim is to capture a circular crop that covers a 180-degree vertical. This way you can capture a single row of adjacent shots, usually 4, using a single-axis panning head to cover the entire 360 degree view area.
Camera
The latest generation of cameras has improved dynamic range compared to older models, which is particularly helpful in 360 photography where we need to capture light from all directions.
Some of my preferred full-frame mirrorless cameras include the Sony A7R series, Nikon Z series, and Canon R series. Commonly used crop-frame mirrorless cameras include the Sony a6 series, Nikon Z series, Canon M and R series, and Fuji X series.
With crop-frame cameras, the selection of cropped fisheye lenses is more limited, so it is more common to use them with full-frame fisheye lenses. In this scenario, for single row shooting, the camera is rotated 30 degrees so that the frame's diagonal is vertical. For portrait position shooting, a two-axis head, such as the Nodal Ninja NN3 or NN6 can be used to capture the zenith and nadir separately.
It's worth noting that Nodal Ninja offers a conversion kit to mount the Samyang 7.5 mm fisheye lens designed for MFT crop-frame cameras on a APS-C crop-frame camera, turning it into a cropped fisheye.
Panohead & tripod
The camera is mounted on a tripod in the portrait position using a special panoramic ring head (aka "panohead"), such as the Nodal Ninja R1, which features a 4-position rotator. Initially, the system needs to be aligned to the non-parallax point (NPP). The camera is also tilted slightly upward by 5 or 7.5 degrees to provide some overlap in the shots, even in the zenith area.
A wireless remote shutter trigger is helpful to prevent camera movement during shooting and to move away from the shooting area where our body could cast shadows or be reflected in glass.
Shooting
Camera Settings
The camera must always be in manual mode, with autofocus turned off, and white balance set to a fixed value such as cloudy sky. It's recommended to shoot in RAW or RAW+JPG mode. The aperture is usually set to F8, with the focus ring positioned between 1 and 1.5 meters and ISO set to 100. With these settings and the short focal length, the panorama will be in focus from less than one meter to infinity (or close to it). These are general settings for panoramas, but for special cases, it may be necessary to readjust the focus ring or use a wider aperture or increase the ISO.
It's important to note that before taking the shots, the shutter speed must be set correctly. The camera's light meter can be used to determine the right balance between highlights and shadows. To start, aim the camera at a 70-90 degree angle from the sun and set the shutter speed to the time indicated by the exposure meter. With experience, you will be able to better estimate this setting, and in situations with a wide dynamic range, you may choose to take bracketed shots.
Once the camera is ready, take 4 shots in the N-E-S-W directions, carefully rotating the camera each time. It's crucial to make sure that the tripod is stable and doesn't move, as this can cause noticeable stitching errors in the final panorama.
Editing and stitching with PtGUI Pro
PtGUI is a professional-grade stitching software used to create panoramic images out of multiple single shots. To learn more about PtGUI you can start with videos and tutorials available on their website.
The first step in processing your RAW files before importing them to PtGUI will be to eliminate chromatic aberration, adjust the white balance, and perform slight pre-sharpening. The files will then be saved in 16-bit TIFF format. After this, any necessary adjustments such as brightness, contrast, clarity, and vividness will be made and the files will be saved again in 16-bit TIFF format.
However, if the workstation does not have the power to handle these large files, the necessary adjustments can still be made, but the files will need to be saved in JPG format. This is an important consideration, as saving in JPG format will result in a significant loss of information from the original file, limiting the amount of editing that can be done in the final panorama. IIt's worth noting that PtGui also integrates an HDR process engine for bracketed images so you can choose whether to use that or your favorite.
Regardless of your choice, the HDR process will need to be done after the first RAW to TIFF conversion.

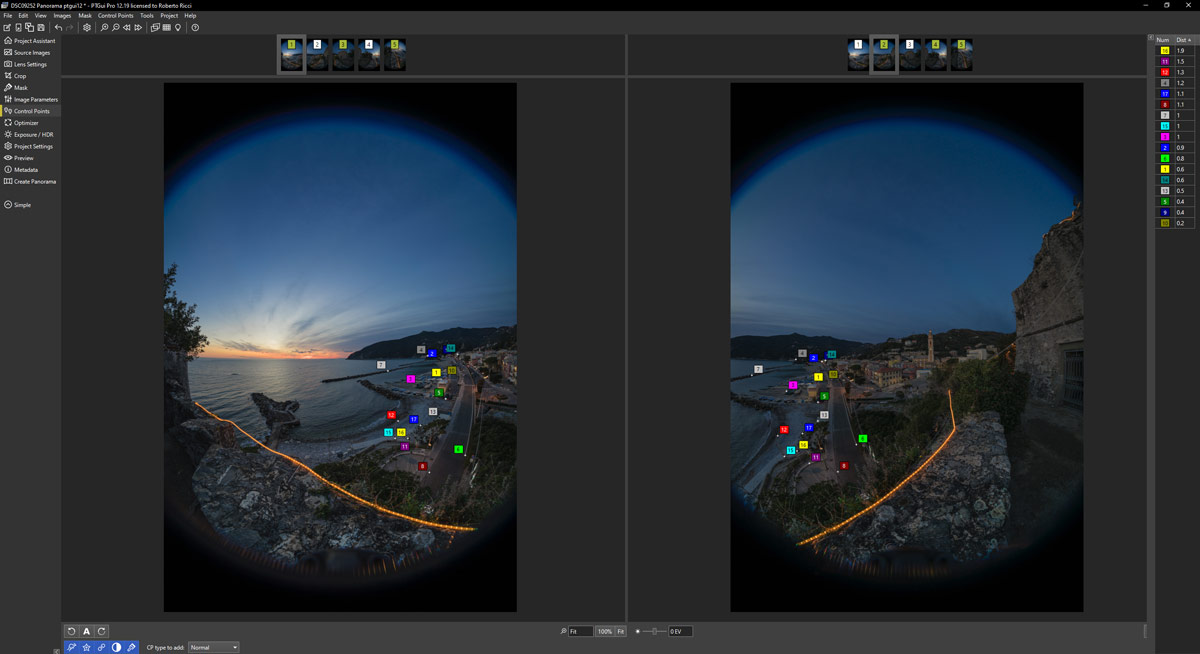
Next, the files will be imported into the PtGui stitcher and the image alignment process will begin. After completion, the "Heavy + lens shift" option will be set in the Optimizer section and the optimization process will be started. The average error value will then be checked. For a fisheye lens, a value between 1 and 2 is considered normal. If the value is lower, it may indicate a lack of control points, while a higher value may indicate problematic control points that need to be repositioned or removed.
The Control Points Table section should also be checked to see if there are control points with a distance value greater than 5, in which case they can be eliminated and the optimization process repeated. If the issue persists, it is recommended to double-check the alignment of the NPP on the panoramic head, verify the stability of the tripod, and try shooting with the central column lowered.

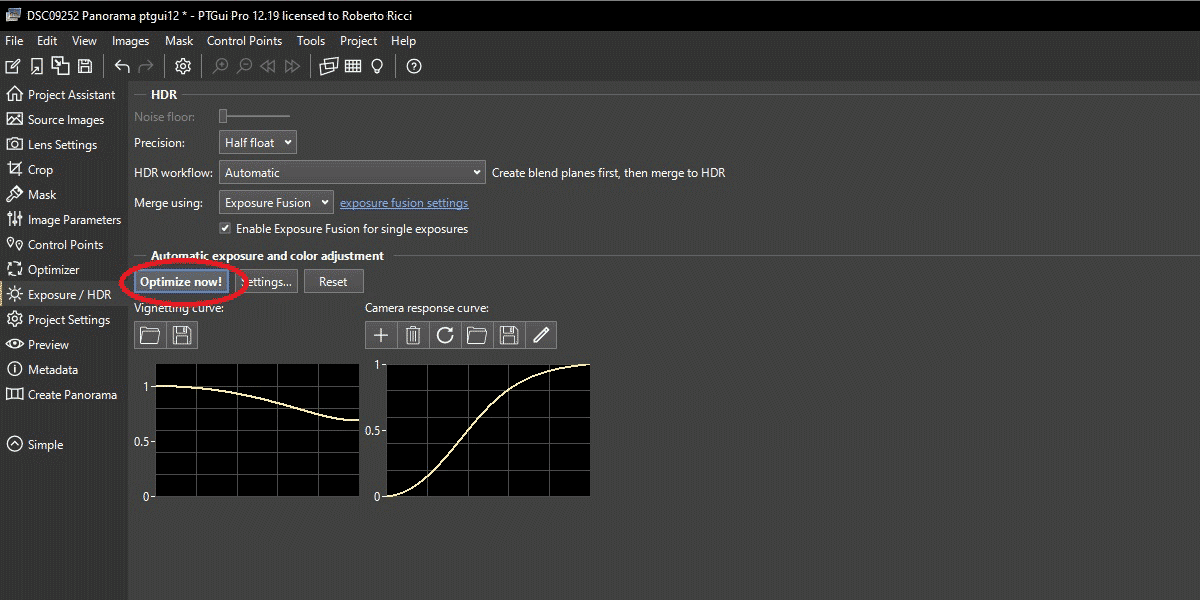
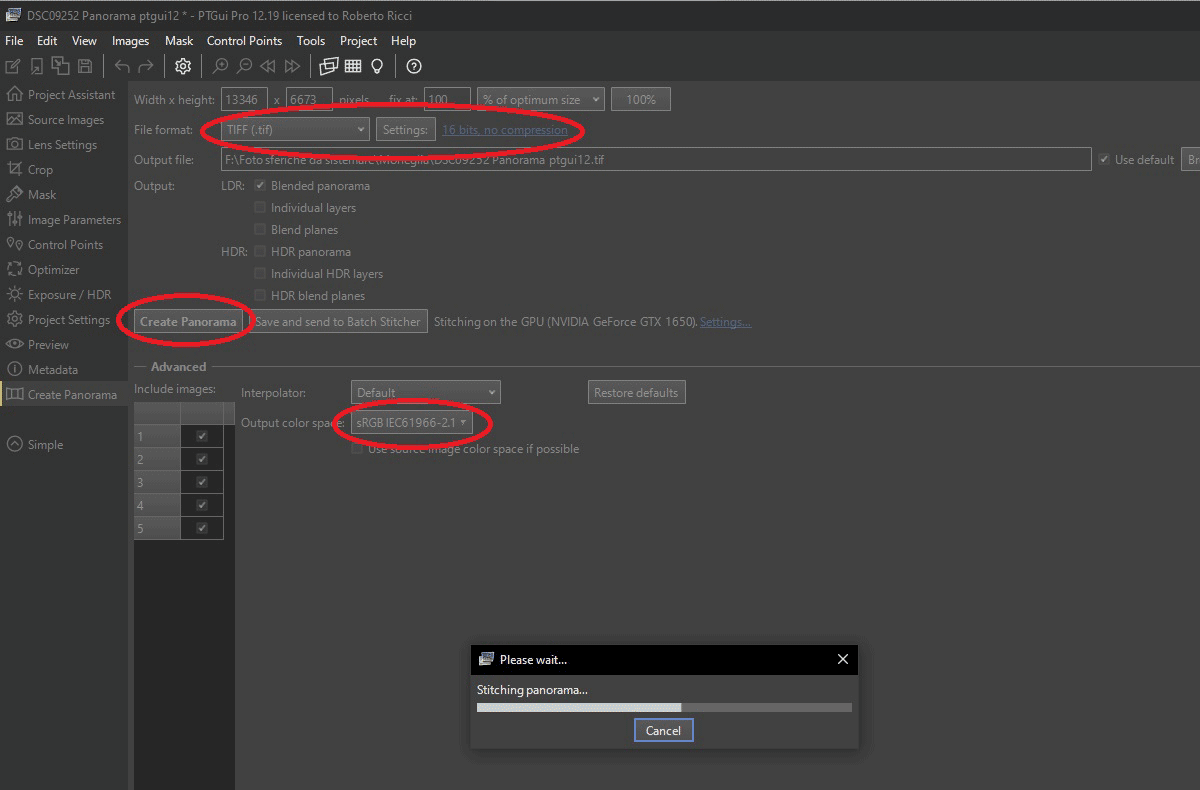
The "Optimize now" option will be started in the Exposure/HDR section, and finally, stitching will begin in the Create Panorama section. PtGui is a sophisticated stitcher with many controls, and it's recommended to watch tutorials available on the developer's website to fully understand its operation.

Once the stitching process is completed, the final panorama will be imported into a photo editing software for any further adjustments, such as sharpening, shadows, exposure, etc. A 16-bit TIFF copy will be saved for archiving and a resized JPG in sRGB format will be saved for web publication. However, using filters that don't equally affect all pixels in the panorama (such as the clarity filter) may result in visible stitching lines in the final image.
As a workaround, you can create a copy of the stitched panorama, import both the panorama and its copy into the photo editor, and arrange them in a 4:1 rectangle. Apply the filters to make adjustments, then crop the middle 2:1 section as the new panorama. This method works, although it may sometimes result in artifacts in the polar areas (zenith and nadir).
Conclusion
This technique for producing 360 panoramas takes time and has a steep learning curve but the end result is the best you can get. Having full control over the images and the entire process is the key to guaranteed success.
Author
Roberto Ricci has been studying photographic technique since the early 90s. He is a teacher and consultant for professional photographers. For some years he has also been active in 360 imaging and has published some works with his own label Enjoy360.
