New feature: 2 easy steps to cross-link your Kuula Virtual Tours

Sometimes you may need to connect two or more tours together. Kuula offers a feature to cross-link between tours allowing users to jump from one tour to another with a click on a hotspot.
There are several scenarios, where you may want to add a link between two tours. For example, when working on a large property, ex. an entire building, it is easier to break the space into several tours - one for each type of apartment and one for the lobby and common spaces. It would make a lot of sense to allow the users to easily move between those tours.
Another case is multiple language versions of a tour. It makes sense to have a link that will allow the user to jump from ex. the English version to Spanish and back.
By default, when you add a hotspot to a post in a tour, you can only select to link it to another post in the same tour. To create a link between two tours, you will need to take those two steps.
Step 1. Copy link to the tour
Open the tour that you want to link to and copy the deeplink. You can do that by simply opening the tour from your profile and copying the URL from the browser address bar. The resulting link will look similar to this:
https://kuula.co/post/7qQZ7/collection/7lPZ8
Tip 1: every post in a tour has its own unique link. If you want to link to a specific post in a tour, first go to that post and only then copy the URL.
Step 2. Add link in the hotspot editor
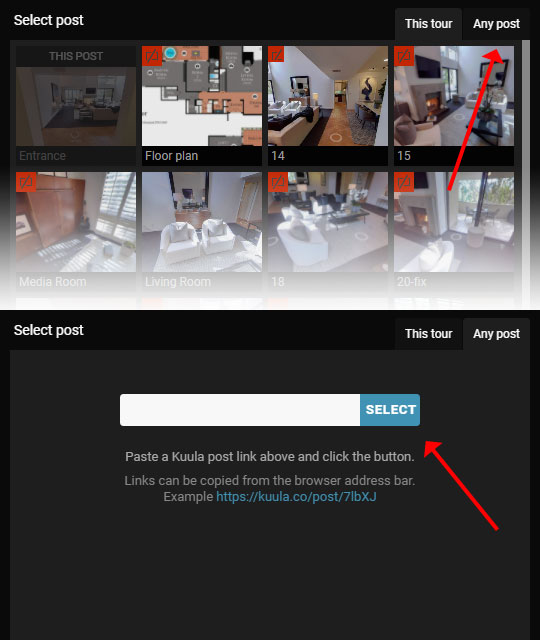
With the link is copied to your clipboard, go back to the tour you are editing. Find the hotspot that should be the link to the other tour and select Go to another post from the dropdown in the Action section. In the popup that comes up, select the second tab, called Any post as shown below:

Paste the link into the text field, hit Select and that's it - the link is ready!
Step 2 (alternative): create an interactive card
Another way to connect tours is to embed one tour into another. In this case, Step 1 is the same as above. After you have a copy to the tour, select Open card from the dropdown in the Action section instead and paste the link in the Media input box in the card.
The pro of this technique, is that the connected tour will open in a popup window and the user can come back to the main tour by simply closing the card.
Tour integrity
After the popup closes, you will notice a warning message appear below the Action dropdown that says Target post is not part of tour You can ignore this warning, because in this case this is precisely what you wanted.
However, this message is part of a set of warnings that are designed to help you keep your tours well structured. If you see it in a place where it is not expected, it means the hotspots connection needs to be reviewed and possibly changed. You can learn all about those messages in this guide.
After you save and exit the editor, you can test your link. You will notice that after clicking on the link, the system will load the post from the other tour, but it will also reload the thumbnails in the bar at the bottom of the browser window.
