How to turn a Virtual Tour into a video - a quick tutorial

Virtual Tours are a highly interactive medium. Users explore them by panning the panoramas and clicking on various hotspots. But sometimes you may prefer to watch the virtual tour in a passive fashion, similar to watching a video. We understand and don't worry, Kuula offers you the tools you need to do that!
Would you like to sit back, relax and just watch the virtual tour? Or maybe you want to create a video of the virtual tour and publish it to Youtube? Kuula offers several features that can be used to turn your tours into a "linear" experience.
Autoplay & auto rotate
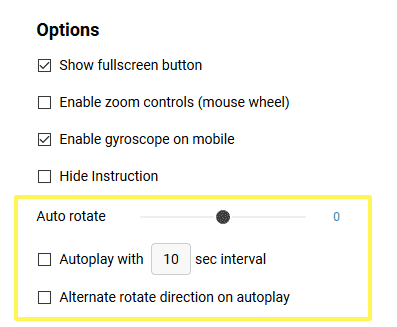
You can start by checking two settings in the export editor: autoplay and auto rotate. You can find them by clicking Share on the right side of any tour, and selecting Get link or embed code from the popup dialog. Once you are in the Export Editor, those settings can be found in Options section:

Using the Auto rotate slider, you can set a speed at which the panoramas will be panning around. You can choose the speed and direction by dragging the handle left or right.
Next, if you select the Autoplay checkbox, the panoramas in the tour will load automatically, one after another at the specified time interval, for example every 10 seconds.
The last setting, if selected, will alternate the rotation direction between one panorama and the next. For example, if the first image will be rotating left, the second one will be rotating right and the thrid one, left again. This makes the playback of the virtual tour more varied and interesting.
The best thing about these options, is that, even tough they put the tour on automatic playback, the user can still interact with the panoramas! You can see it for yourself in the demo below.
Audio
Another great feature for playback of virtual tours is audio intergration. While it's not required, audio will make watching the tour much more enjoyable!
With Kuula, you can add a background audio to a tour and you can also add audio tracks to each individual photo. For example, in the demo below, we added a music loop as the background audio and several voice over recordings that play as the tour moves between panoramas, showing different parts of the property.
Adding audio is a Kuula PRO feature and it's very easy to use. You can simply upload audio tracks to your library and then add them to the tour or individual posts. For an in depth guide to the audio feature on Kuula, please check the tutorial below:
Demo
After you put all this together, you can export the tour for embedding or as a shareable link. Here's a demo tour we prepared for you to show these features in action:
Recording videos
You can take it a step further and turn the virtual tour into a video. A video can easily be uploaded and shared to YouTube or other video hosting websites, you can also add it to your listings. To create a video, you can use any screen recording software and set it up to record the content of the browser window in which you open the tour link.
Popular screen recording apps include Quicktime (free) or Screenflow (paid) on MacOS and Snagit/Camtasia on Windows (paid). There are also Chrome extensions such as Loom (free & paid options) and a number of mobile apps for both Andorid and iOS. We use Snagit, which is fairly basic and offers a minimal set of features, but it is easy-to-use and inexpensive.
We recorded the tour running on autoplay, trimmmed a bit the footage and uploaded it to YouTube right away - all in less than 10 minutes. Here's the final effect:
To create the voice overs, we used an automated text-to-speech software called Amazon Polly. It's free, easy to use and supports several languages. Of course a natural human voice recording is always better, but this is something to consider if you need to add a voice over quickly... or if you are on a tight budget ;)
And that's it! We hope you enjoy this technique and will find it useful for your 360 content!
